Table of Contents
Preface
Please be aware that this guide is not all-inclusive and may or may not apply to your ants. Much of this can be used for the vast majority of ants that are kept, but some ants, such as Atta or other leafcutters, army ants, et al. will require some special care. If you’re unsure, feel free to ask on the forums if this guide applies to your ants. Also be aware that all of these methods are used by hobbyists and amateurs and not professionals. None of us, including me, will take responsibility if something happens to your ants.
I wrote this as a general outline for beginners to the ant keeping hobby. This is not supposed to be a step-by-step procedure on raising queens or colonies; it is simply here to answer your basic questions and get you going in the right direction. This is not a scientific paper, or anything similar; just a conglomerate of ideas, methods, and techniques used frequently in the anting community. I, and I’m sure most other hobbyists, do not condone artificial wars, or anything that could knowingly cause the ants harm. That being said, please enjoy this guide and I hope you find some useful information in it.
ID Your Ant
The first and one of the most important first steps to any ant care is to get your ant identified. Take a few pictures, a measurement (in millimeters), and create a somewhat detailed description of the ant and where you found it (location based on the nearest large city is extremely important) and go post it up on the Anting and Observation forum. Within a day or two someone will likely be able to ID your ant down to genus, perhaps even species. Be sure to read this thread and follow the forum rules before and when posting your ID topic.
Usually genus is enough to get a clear idea on how to care for your ant. Some ants, of course, are social parasites or semi-claustral and can make their care requirements a little harder to meet. I’ll get more in-depth on these two stipulations further down.
Queen Care
Queen care can be a bit different than caring for a mature colony. In this section I want to outline the different techniques used for the different types of queens. Some queens can be trickier than others or have special nesting requirements, food requirements, or something else. This is not meant to cover all instances, but just give a general idea of how to care for an easy-to-raise queen such as your typical Lasius niger.
Note
Before I get into the queen care, I would first like to inform you that this isn’t an exact science. Queens up and die all the time for no apparent reason. Later on I will try to cover causes of death, and such, but not all of them are apparent. Also keep in mind that no matter what kind of setup you use, you would do well to clean it thoroughly with hot, soapy water followed by an alcohol bath. After the alcohol bath, rinse it thoroughly and let it air out to get rid of the alcohol fumes. This process ensures that there are no fumes, residues, or microbes that could be harmful to your queen.
Differences Among Queens
The first thing you should know is queens can be effectively divided into three categories: fully-claustral, semi-claustral, and socially parasitic. I shall cover each type in the coming sections as they all have different needs.
Fully-claustral
Fully-claustral queens are typically bulkier than semi-claustral queens, with smaller heads proportionately to social parasites and semi-claustral. The reason for this is that they do not forage or need to fight during the founding stages since they spend their entire time in the nest. These queens are the easiest to care for and the most important things to keep in mind are humidity and disturbances; you can typically just put them into a new home and forget about them for a month. They nourish themselves through fat and food stores along with metabolizing their wing muscles.
Semi-claustral
Semi-claustral queens are usually thinner and require a foraging area and access to food during the founding stages. These queens can be trickier, but are fun to watch. Some of them have specialized diets, but I won’t be delving into that. Food requirements vary from species to species, but for the most part the diet is comprised of sugars and insects.
Social parasites
Social parasites are the third type of queen ant. These queens are usually somewhat stocky like the fully-claustral queen, but have larger heads and mandibles in proportion to the thorax compared to their fully-claustral counterparts. These queens need a host in order to found a colony. Typically they invade a colony of their preferred host species, kill the queen, and use the workforce to raise her own brood. In order to care for these ants properly you will need to identify their host, collect some workers and brood, and then attempt to introduce them. AntsCanada has a lovely video tutorial on how to perform a proper introduction, and batspiderfish has a thread about social parasites here. Keep in mind that these introductions are not an exact science and often fail. If it does fail, it is possible that it will result in the death of your queen at the hands of her host workers.
In addition to the links provided, I will give a brief guide on how to introduce parasites to their hosts. First you need to refrigerate both the queen and her host workers for a few days. The longer workers are separated from their colony, the more likely they are to accept a new queen. After this is done, add one worker to the queen while they are all still in the refrigerator. The cold slows them down and usually limits their aggression to posturing. In some parasitic species the queen will kill the worker in order to use the worker’s scent to infiltrate the colony, if this happens, do not be alarmed. Add a second worker, watch for signs of aggression, if it escalates to the point of combat, separate them and try again later. If all goes smoothly and you get the workers introduced to the queen without incident, leave them in the refrigerator for a few more days in order to allow the scent to really stick and get the workers used to their new queen.
A final note on social parasites: please keep in mind that some species are obligate slave-makers. This means that they need a regular supply of host brood to keep the enslaved workforce going in order to succeed. Some of these ants have evolved to the point that they cannot care for their own brood or perform normal nest activities without the assistance of slaves. It is hypothetically possible to rear your own colony of their host and use that to keep their slave workforce steady, but I don’t know of anyone who has done it.
Setups
Among the most commonly asked questions is “What can I put her in?” The correct answer is just about anything. As long as your semi-claustral queens can forage, and your fully-claustral queens feel secure, just ensure that there is an easy way to maintain the nest, adequate humidity, and surface to view them from. In this section I will outline a few of the most common techniques and items used.
Test tube setup
The test tube setup is extremely cheap and easy to make while providing all of the key things a good claustral chamber needs. You fill around 1/3 or ½ of the tube with water, plug it with a piece of cotton, insert the queen, and then plug the open end with a dry piece of cotton. The water is needed for them to drink, and to maintain humidity or else they will dry out and die. The piece of cotton inside holds back the water to prevent drowning while also allowing an easy drink for your new pet. You can make it tighter or looser fitting as a way to help increase or lower humidity levels in the tube, too. The piece of dry cotton on the end allows air flow so she can breathe, and also keeps her from escaping. The test tube setup is nearly perfect for any queen or small colony. You can even add dirt or sand to give it a more natural look or feel, or for queens who like to dig. Dirt also helps prevent deaths from flooding most commonly encountered with small species such as Solenopsis molesta. You can find AntsCanada’s tutorial on it here.
Test tube alternatives
A common replacement for test tubes is vinyl aquarium tubing. You can easily find 10-foot lengths of this stuff at your local Home Depot or Lowes. Cut it into smaller (3-6 inch) segments, plug one open end with cotton, clay, or something else, and follow the above procedure for the test tube setup.
Another replacement is a prescription pill bottle. You can usually get them for free from your local pharmacy, and they can make wonderful impromptu test tubes.
Plaster/ytong/pumice/grout
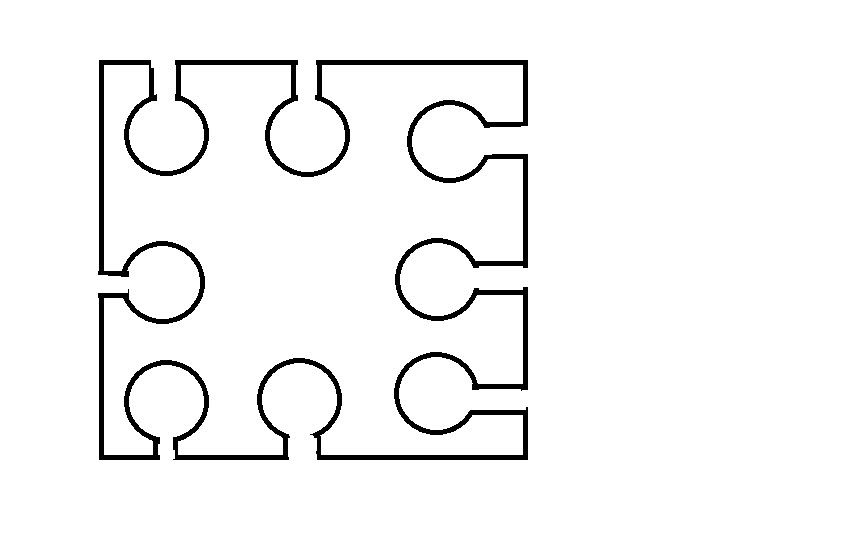
Another option is a plaster/ytong/grout/pumice setup. With a small plaster block molded or carved with small chambers and covered with a piece of glass, you can easily fit 3-6 chambers on one 6x4 block. In general, the amount of space given to a queen is 1.5x her body length, and 1.5x her height. This gives her adequate room to maneuver, while also making sure she feels secure. Mold or carve little tunnels to place tubing into to allow each queen access to its own outworld and eventually a formicarium for the colony to move into. This is particularly effective if you are raising many queens that you intend to keep as it saves space, time and money early on. As the queens do their thing, you can work on making each a formicarium to eventually attach to it. An illustration of what I’m talking about can be viewed here.
Or using this same idea, craft a small formicarium out of one of these materials, place the queen inside and she will find a proper place to raise her brood. One small 6x4 inch block utilizing space properly can house a colony for years. It’s cheap, easy, and effective especially if you are only raising one or a few queens.
Household containers
Pretty much anything you find around the house can work as long as you ensure that it is cleaned out, first. A jar, with a layer of dirt on the bottom, or filled all the way up, can be a wonderfully successful environment, and provides plenty of space for quite a long time. I once crumpled a piece of damp paper towel up and placed it into a small cup for a Camponotus queen and she was able to successfully raise her first workers in this.
Heating Queens
I go into more depth on heating in the formicarium section, but I figured I'd throw a section about it here. Heating your queens can shave a week off of brood development time, but don't expect miraculous 15-day development cycles. Queens found in the temperate zone should be kept around 76 degrees F or 24 C. Bring it up to 80 F or 26 C for desert or tropical species. These tend to be the sweet spots for each zone. Higher than this and the queens will likely react poorly and attempt to move, or even die from the heat. You can certainly go lower, though. Anywhere around room temperate is fine.
Feeding Queens
Fully-claustral
Ultimately, feeding a fully-claustral queen is a personal choice. They don’t require any food for many months because they typically have fat and food stores, and will metabolize their wing muscles for nourishment. If you do decide to feed them, it’s common that they won’t accept protein in the form of insects, but they usually go for sweets. There are, of course, exceptions to this rule; my Aphaenogaster queens ravaged termites I gave them readily, for instance, but this isn’t always or even typically the case. Usually a dab of honey, maple syrup, or sugar-water will suffice. I like to mix whey protein shake powder in with my maple syrup/water mix and all of my queens and colonies simply love the stuff. It’s a great source for protein, but do note that you likely won’t see any increase in numbers or size of nanitic workers when feeding a queen.
Semi-claustral
Semi-claustral queens need food. You can still use a typical test tube setup for them, but instead of sealing it off with cotton, leave it open and place it into a box. Put food into the box, and the queen will find it and take it back to her tube. These queens usually will accept protein, especially when larvae eclose, and in some species, seeds. Giving her some sugar isn’t a bad idea either.
Nanitic Workers
When nanitics arrive, it’s likely time to start thinking about food even if your queen is fully-claustral. You likely won’t need to feed them until the nanitic workers begin trying to open the nest and you can tell they are ready to open it if they are tearing at the cotton plug sealing them in. Until then, though, it’s likely not necessary as the queen will feed them from her own reserves. When it’s time, however, have some sugar available, and maybe a small arthropod. Something soft and/or torn open with some needles/pins/tweezers to allow the smaller, weaker ants’ access to the good stuff. I like to give my young colonies pieces of large spiders, or if I can find any, whole small spiders with a tear in the body. Tearing off the meaty, metathoracic legs of a cricket and tearing open the tibia slightly will give them access to the muscle tissue within which is rich in protein. Fruit flies and termites work well, too, and I have never seen a colony refuse termites.
Freezing before feeding
In any case, I should let you know that arthropods can carry mites, diseases, or parasites that can be harmful to your colony. I strongly suggest freezing any food for a few hours at least before feeding. I store my insects in the freezer until it is feeding time. They will last for a long time in there, but like other foods, freezing and thawing repeatedly can cause them to spoil. I have also noted that after spending long periods in there (months) they look fine, but once removed they turn black and usually aren’t accepted. It may be they just happen to not want any insects at the time, but I think it’s more likely that the food spoiled. Some people keep their insects in the freezer for months, though, and experience no issues.
You can also boil the insects. It, too, provides a humane death as it kills them instantly. Heating water on the stovetop or in the microwave them dipping them in quickly will kill just about anything on them while also washing away some potentially harmful chemicals if any are present. It's not a surefire method of pesticide removal, though.
Methods of Feeding
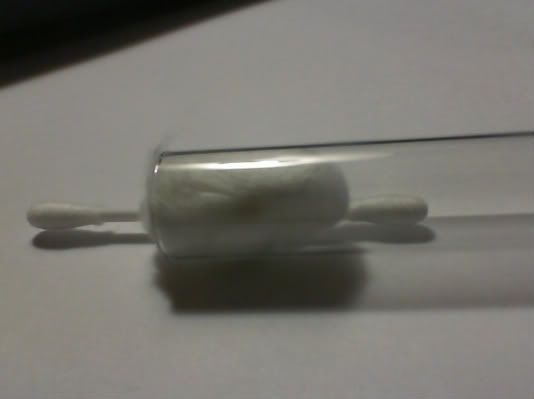
You may be thinking “why do I need to know how to feed my ants? Lol” but there can be problems if you’re just dropping drops of honey and what not into the test tube. Sometimes ants can get stuck and drown in those drops, or they’ll walk through them and make a huge mess which can mold. I find it’s significantly easier to dip the cotton plug slightly into your liquid foods and pop it back in. Or cut a Q-tip in half, dip one side of the cotton end into the liquid, and put it in. Lock it in place using the cotton plug dry side against the wall. With these two methods it’s very easy to clean their mess and prevents drowning. I have a picture for this here.
Queen Problems
Sometimes not everything goes smoothly with your queens. Problems do occasionally crop up and I want to attempt to help you deal with those problems.
Settling/Cotton tugging
Many times when the queen first goes into the tube she will start tearing at the cotton plug. This behavior may last a week or more, but you just need to be patient and leave her be. Sensory deprivation can help get her to settle down and settle in a bit faster. Put her in a completely dark place where she won’t be disturbed, and give her at least three days before you check on her. There are instances where she will do this until she’s dead, while it is sad, it does happen, and if it goes on any longer than a week, I would consider a different kind of setup for her. Many Pogonomyrmex queens, for instance, do not settle well in test tubes and usually perform far better in a dirt setup.
Then there are times where a queen gets a rough disturbance like being dropped and she may start tearing at the cotton all over again. This happens because she deems her nest to be unsafe and likely is prepared to abandon her brood and start over. Give her a few days of sensory deprivation, and maybe a day in the refrigerator if necessary to try to calm her down. Sometimes, though, she won’t calm no matter what and you may be forced to release or euthanize her.
Fungi
Fungi can come in all different colors and shapes. Zombie-ant fungus, insect-infecting Aspergillus flavus, common house molds, etc. can all be harmful and fatal to an ant or a colony of ants. If you spot mold in one of your formicaria, I suggest moving the colony as soon as possible. I will detail how to move a colony in another section, so bear with me. If you happen to be having worker or queen die-offs, leave the dead specimens in a container with a lid for a couple of days and see if they sprout any fungus. Some fungi will grow within an adult ant and end up eating it inside out. If after a day or two in a sealed container they do not sprout anything, it is likely that a fungus isn’t the cause of death.
I would like to point out that it is very common for plaster of paris formicaria to develop a red fungus after a time. This fungus doesn’t seem to be at all harmful to the ants. A colony of Aphaenogaster I had spent a few months in a plaster nest with this red mold spreading rather quickly without an issue. Other ant keepers have reported the same thing.
Dirty tube
Ants poop just like you and me. Sometimes you get lucky and no mold ever sprouts inside your test tube, but after a while you’ll notice the cotton and water looking yellow to brown in color. That’s ant excrement and it can be gross to look at it. It shouldn’t be harmful to your ants, but I always move them once the water gets contaminated by it.
Parasites
Sometimes your queen’s parent colony will have a mite infestation, or perhaps some food you gave her was contaminated. In any case, if you see extremely tiny (like pinhead size) dots on your queen or running around your tube, it’s likely you have mites. Unfortunately there’s not much I know of that can be done about a mite infestation in ants. With reptiles, they have mite powders that will dry the mites up without harming your pet, but I’m afraid these products are just as likely to kill your ant(s) as they are to kill the mites. Fortunately not all mites are detrimental to your ants so it may not be a problem at all. One thing you can try is offering lemon or orange juice (freshly squeezed from the fruit) on some cotton. Ants are smart, they know if they have a problem and how to deal with it. It's possible they'll use the acidic lemon juice to dry out and kill the mites taking care of the problem on their own. This thread has some information on mites and dealing with them.
Some people have also found dead queens with small, larva-looking things in the test tubes. These are usually parasitic flies or even wasps that laid eggs on or in the queen. Once they hatch, they can chew through the queen's gaster causing death, and will usually eat their victim after. There's no way to know if your queen has a parasitic wasp or fly larva in them, and nothing you can do after it kills your queen. Some people keep them until they mature and get them identified so they know what they're dealing with, others send them off to labs to get identified, but that's about it.
Brood problems
Sometimes everything is going right with your queen, but you notice the brood keeps disappearing, she constantly has a pile of fresh eggs, or you even catch her eating her brood. This can be caused by stress or environmental factors killing the brood. Sometimes queens are just fail moms, though. I had one queen who refused to help her workers eclose. She didn’t even remove the cocoons. If your queen is discarding her brood, or potentially eating her brood, I suggest taking a close look at the environment they’re in and making there is no reason the brood is dying. If there is no apparent reason for brood deaths, ensure that she is being left alone. Only check on her once a week, and put her somewhere where she won’t be bumped, exposed to vibrations or any other disturbances. If all of this is done and she still isn’t producing, or is still eating her brood, consider her a fail mom. In this case, there is no harm in keeping her until she dies or perhaps gets lucky and produces some offspring.
To add to this, queens routinely feed eggs to larvae. It’s a little protein to help their developing bodies. Also, sometimes queens simply lay a bundle of eggs and slowly consume some. A Formica queen of mine did just this. She had a sizable pile of eggs, but ended up with only one third instar larva and no eggs or any other brood. It eventually pupated and eclosed, however, so no problem.
Spontaneous death
I classify deaths without apparent cause - that is to say there may be a cause, but I’m at a loss as to what it is - as spontaneous deaths. I’ve had many of these over the years and still don’t know what the issue is. It could be genetic, a disease, reaction to fumes, residues, or the stress of being caught, or some microscopic or nearly microscope life-form such as a mite. If you fail to find any likely cause of a queen’s death, and no fungus sprouts after a couple of days in a clean, sealed container, chalk it up to luck of the draw. I wish I could explain every queen’s death or failure under my care, but alas, I cannot.
Colony care
Caring for a colony in a formicarium can be different than caring for a single queen or fledgling colony. They will need a variety of foods, plenty of space, an outworld, preferably a moisture gradient, and perhaps a temperature gradient. I will discuss and offer some ideas on how to meet these properly but first I would like to state a few things to know about catching a wild, mature colony and rearing a colony from a new queen.
Mature vs. new
Do it right
First, do it right. Many people find a mature colony and are able to catch a queen from it. I would first like to say that this in and of itself is fine in my eyes as long as you do It properly and I’m sure most enthusiasts would agree.
Never take a queen without workers
First, never take a queen from a colony without also taking her workers. After workers start pampering and caring for the queen, it is unlikely she will survive if she is removed from them. They tend to be come wholly dependent upon their workers, so if you can’t catch most or the entire workforce with a queen, don’t collect a mature colony. Polygynous species are an exception. Catching only a portion of the queens and workers from a polygynous colony will allow the remaining portion of the colony to live on and give you a mature colony to keep and observe.
Ants share their home
The next problem is destruction of a home. Many creatures live in and on the earth and logs that ants also occupy. IF you have to dig up a colony to get it, don’t bother. Most ants dig many feet below the surface over a wide area so it is unlikely you will locate the queen, and even if you do, you could kill her. Ants nesting in wood are a different matter as they are usually easier to obtain. But most wood-nesting ants practice polydomy, so it’s possible the queen isn’t even in the log you’re tearing apart. In any case, please take care to not destroy the homes other creatures just to obtain a colony unless you’re sure a queen is in it.
Stress inducing, it is
Another problem that can arise is stress. A mature colony has likely lived and thrived in the wild for some years and a sudden home invasion, destruction, and capture can be extremely stressful for a colony. New queens off nuptial flights adapt to captivity far more easily than a mature colony. Sometimes a mature colony will have a large worker die-off after collection, so be prepared.
Queens don’t live forever
The final thing I’d like to note is the age of a queen. The queens you find in a mature colony are possibly quite old; some can live upwards of 30 years! So be advised that without knowing the age of the queen in a mature colony, it’s possible she and her colony will be approaching the ends of their lives.
Formicaria
Now I would like to discuss are the different types of formicaria you can use and how they work, are made, and what kind of things to expect from them.
Uncle Milton/Gel farms
You or your child may have received one of these ant farms as a gift or something, but let me inform you that they are not suitable for raising a full-blown colony. They mold easily, the gel doesn’t have the nutrients ants need, plus ants like variety, and most colonies only last a few months to a year at most in these. They are designed for small children and only to view a few aspects of a colony. Please, if you are going to get into serious ant keeping, ditch these and make one. There are places you can buy them such as AntStore and AntsCanada to name a couple that are very high quality, but a lot of time goes into these and they tend to be expensive.
Substrates
Many ant farms are medium-less - that is they don’t have sand, dirt, wood or anything else in them for the ants to excavate. You can, however, use these things in just about any formicarium to some degree. I like cork for wood-nesting ants. You can buy corkboard cheap, it’s easy to cut, absorbs water, and acts similarly to wood in regards to excavation. Ants cannot digest cellulose, so they don’t eat wood or cork at all, so there is nothing to be concerned about in regards to ants ingesting the cork.
You can also use a sheet of wood with a glass/plexi-glass cover, and a hard backing and carve your own chambers, or perhaps make a starting chamber and let the ants do the rest. Not all ants can handle wood, and most species inhabit decomposing wood which is much softer. Saw dust or wood chips can be a good alternative to cork or solid wood, as well. Just ensure that it isn’t cedar, treated with any chemicals, or pressure treated beforehand.
Then there is always sand and/or dirt. You can buy safe, quality dirt from your local pet store in a variety of colors to help stylize or contrast against your ants for better viewing. If you take dirt from outside, it is recommended that you bake it at 400 degrees for a few hours before use. It will kill any bacteria, fungus or parasites hidden in it before it causes problems for your ants. Again, ensure that it has no pesticides or other chemicals in it.
You can use just about any of these substrates to any degree. Some people like to just add a layer for aesthetics or to make it feel more natural to the ants, some like to fill their formicaria with it so ants can excavate it. I will say that medium-less nests offer a lot, but they don’t have one of the neatest things about ants: nest construction. You tend to carve your own tunnels and chambers into the material, so the ants don’t get to do anything. Different ants, however, craft differently shaped nests and it can be interesting and fun to observe how they do it and what shapes and style they form their nests in. That being said, you can easily take a medium-less nest and add dirt to the empty portions to allow ants to excavate and witness how they do it.
One of my preferred formicaria is taking a plaster nest, and instead of molding or carving the tunnels and chambers, I roll out a square of clay and place it on the glass. Once that’s molded, remove the clay and add a substrate. I can easily view the nest construction, see how they form their nests, what kind of structure they use, and it has all of the benefits of a typical plaster nest. The only problem with this method is ants tend to stick dirt and stuff to the glass impeding my view. Perhaps a piece of red cellophane over it would prevent this as I assume they do it to block light.
Medium-less formicaria
Medium-less formicaria are those that have no dirt, sand, wood or anything for the ants to manipulate. They offer high visibility, are easy to clean, and easy to make. They are probably the most common formicarium used by ant hobbyists. They are typically made out of plaster of paris, gypsum, or autoclaved aerated concrete (AAC or ytong), and have tunnels as well as chambers carved into them for the ants to nest in. Some people have also used grout and pumice for these. Grout needs to be mixed with perlite or another absorbent material in order for it to absorb moisture. Bugbarb has a lovely guide on how to create a grout-perlite nest.
Plaster.com has many varieties of gypsum you can use. The most common are Hydrostone and Tuf-stone. Both of them are significantly stronger than plaster of paris and offer equal absorbency, while also being extremely mold resistant. Mold can still form on stuff within the nest, such as dead insects and food, but it will not spread into these materials. I would highly recommend investing in one of these materials if you plan to take this route.
This thread has a lot of excellent formicarium ideas many of which are medium-less.
You can make them horizontal and vertical depending on what you prefer. I do believe ants have a greater tendency to muck up the viewing surface of vertical nests, though.
One of the easiest medium-less formicaria to make is the test tube formicarium. Simply take your test tubed queen and place her and the tube into a box. The box will act as an outworld, and the colony will continue living in the test tube. As space demands rise, add more test tubes each setup with water and cotton. It’s cheap, effective, easy to make, and offers excellent viewing. I do suggest using clay or creating a paper base using tape to keep the tubes from rolling around.
Some people also make and sell formicaria. Mordam on the Yuku message board, owner of Tar Heels Ants, is currently producing and selling some very high quality ytong nests in the US. You can view his thread with images and price information here. I have personally purchased one along with an outworld and can vouche for their high quality and effectiveness.
Space
Space problems can arise. Typically if there is too much space, ants will start dumping garbage into the unused, empty chambers. Using some sort of substrate to fill in these voids can prevent this. If this does happen, simply add water on the opposite side of the formicarium to reduce the occurrence of mold.
When the space runs out and you need to expand or move them into a new nest, you can apply the same techniques as you would for a queen to move them. That is, use heat, moisture, and light to get them motivated into finding a new nesting site.
Nest Design
A lot of people like the art aspect of nest design, which is fine. Being creative with your formicaria is fun, and a fulfilling hobby. This section, however, focuses more on the science aspect of it. Different species of ants design their nests in the wild differently, so in order to reduce stress, make them comfortable, and try to ensure a successful colony it's best to use their nest designs as a template for your own. Then you have to consider the engineering aspects of it such as nest hydration, ventilation, escape-proofing it, and connecting outworlds and expansions.
First, I'd like to say that I don't know every species nest designs - only a few. I do plan on performing a few experiments some time in the future, as well as some research, in order to get a handle on nest construction to further my own ant-keeping ambitions and I'll be adding my findings to this guide in order to help out future myrmecophiles. Also note that this is for medium-less nests. If you have some sort of sand, dirt, wood chips, or cork inside your formicarium already then the ants will be able to construct the nest however they like.
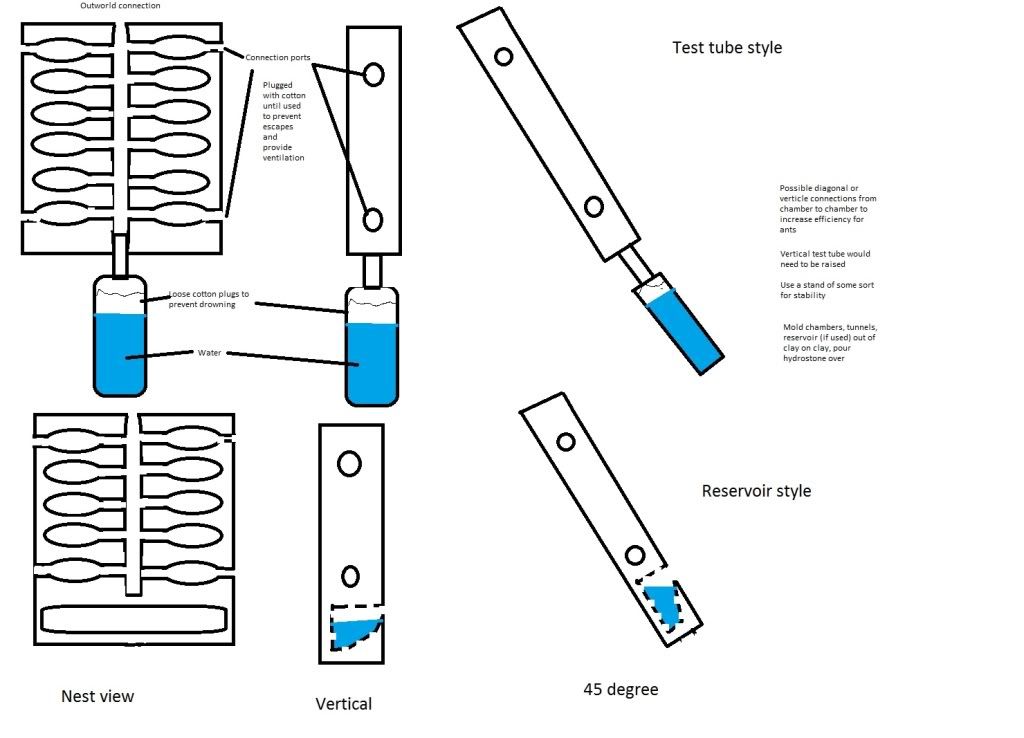
Consider how a species builds their nests; I'll use Formica in this example. Many Formica species build one deep, vertical shaft then branch out into their chambers. Now consider how you can implement this design into your formicarium. The way I envision a desirable design for a Formica nest is a 45 degree, or a vertical nest design, with a wider shaft from top to bottom. Then the branching, narrower tunnels connecting to chambers. OK, solid design, but now here comes the engineering.
First question to ask: how will I keep this moist? For this design, because it's vertical or 45 degrees, a reservoir on the bottom molded with a lip would probably work well. The reason I say put it on the bottom is because that would allow a top connecting point for the outworld mimicking what they do in the wild, and gravity will work against the water creating a moisture gradient as I've talked about elsewhere. The other option could be a test tube attached to a connecting point at the bottom, possible on one side or another, and simply allowing water vapor to work it's way through the nest without wetting the plaster or ytong itself which will reduce the possibility for mold. Also keep in mind many Formica like it relatively dry in their nest (about 40% relative humidity) so the test tube idea seems even more attractive.
Great, we have the design, and the hydration system, now we work on connections. I try to include four or five connecting points in all of my formicaria. It allows some leeway in where I position the outworld connection, as well as where I hydrate the nest manually to prevent mold if they're dumping garbage within the nest. One at the top of this, then two on each side connecting to the chambers for future expansions, or manual hydration sounds promising.
If we mold the whole thing with clay on a piece of glass, then pour our plaster or hydrostone on it, it will be escape proof provided nothing breaks, or chips.
Then we get into space efficiency. We don't want to have to move the colony any time soon, so how can we make it more spacious? First, we'll decide on glass size. I use 4x6 inches or 5x7 inches to start. Next, I try to cram tunnels and chambers together while keeping to the template. Remember, the template is a rough guide to follow, it doesn't have to be to the letter. Adding a little artistic flare, or just being as efficient with space as possible is a good thing. Then we can make the entire nesting area slightly deeper. This will allow the ants to pile brood nice and high, then sit on top of it, while also increasing the area for them to move around by increasing the 3-dimensional surface area.
So, there's a little outline on how to design a formicarium, and engineer it properly to ensure efficiency, and to give the ants what they desire/need, while also allowing room for artistry if we so desire. I'm not creative at all, so my design would look a little something like this.
Heating
Heating is pretty much always personal preference unless your house is kept at 60 degrees, or something. Generally the sweet-spot for ants found in the temperate zone is around 76 degrees Fahrenheit or 24 degrees Celsius. For a desert, or tropical species you might want to increase it to 80 F/27 C. Heating in this way can shave a week or so off brood development if it's constantly applied, but monitoring temperatures in test tubes or formicaria is rather difficult.
Taking the Temperature
You can use those small, adhesive strip thermometers usually used for aquariums on the inside of your test tube, or formicarium, in order to measure the temperature. Perhaps a probe thermometer for taking temperature under the tongue, or a meat thermometer with a probe could be inserted to get a reading as well. Test tubes have it easy, though. You can take a shoebox, or a motherboard box, or any small box, really, punch some holes in the sides, put a lid on it, and heat that with a thermometer in it in order to warm test tubed queens. The temperature will be relatively evenly distributed throughout, and each test tube will be warmed well. I suspend my test tube box over a heating pad using books. For my setup, around three inches above the heating pad brings it almost perfectly to 76 degrees F, and the lid provides total darkness. As long as I leave my queens alone, they do very well. Currently my C. castaneus queens both have a large number of brood, and one even has two workers.
Heating Methods
You can use a variety of methods to heat your ants. The most common is probably with a heating pad, but there are also heating lamps, cables, and ceramic heat emitters that can work well. Some people just use their PC and place the formicarium/test tube near the exhaust fan, or some other improvised way. Just be creative!
Heating Lamps
I'd like to talk a little about heating lamps. There's an old myth that ants can't see red, but this just isn't true. Some relatively recent research has shown that most ants respond to Scarlet Red, and various species react differently to different shades of red. This thread has a post of mine listing many articles on this subject; feel free to peruse them. What matters most is light intensity, not color. Try using a ceramic heat emitter or a darkly colored bulb, perhaps the infrared night bulbs for reptiles, to prevent your colony from stressing over the light.
Outworld
Outworlds are necessary to keep the nest clean, to allow the ants some area to explore, and to make things easier for you in regards to feeding and cleaning. Some people go all out with their outworlds and use stuff to decorate them, or in some cases grow plants in. You can, however, just use a simple, empty plastic box. Food dishes make cleaning up and offering foods much easier, and I highly recommend using test tube caps, or aluminum foil as dishes for feeding.
Using the outside world
Some people have even used the outside world as their outworld. This comes with certain risks, of course, and usually requires some meticulous work to keep the colony from escaping. Simply using a long length of tubing out a nearby window, you can effectively allow your ants to venture outside and find food on their own without you having to feed them. In order to do this, though, you will need to create some sort of barrier that prevents the queen from getting out, but allows the largest workers to pass. It should also be noted that you would likely need a strong material such as plastic for this so the ants can't chew through it. If the queen(s) can’t escape then the colony won’t leave.
The risks of this include workers dying, potentially bringing in harmful bacteria, or parasites, or an invasion by another ant colony or creature. A spider may find its way in and perhaps cause harm to your ants. I would suspect the ants could handle problems like this, though. But with say, a common host of a slave-making ant, you may find a raiding slave-maker colony in your formicarium. Regardless of risks, it’s still an interesting idea and something I would really like to do one of these days.
Open air outworld
A lot of people prefer an open-air outworld. This helps to keep things from getting moldy, keeps the smell inside down, and makes it easier to clean and feed the ants; but how do you keep the ants inside? There are a variety of potential barriers you can utilize to keep ants contained.
Barriers
Extra virgin olive oil is probably the most used. Take a wad of paper towel or cotton ball, dab it on the oil, and “paint” an inch-thick layer of it along the top of the outworld. Allow it to settle for a few hours before use since it tends to drip for a while and can drown ants caught in it. If it drips, just wipe up the excess with a clean paper towel. Make sure you get the corners, too! There are some ants who have no troubles walking over this, and it doesn’t last all that long.
Another common barrier is Vaseline. This store-bought compound is a good ant deterrent. Again, though, some ants have no issues walking over it especially when they get frantic.
A homemade barrier uses baby powder (talcum powder) and isopropyl (rubbing) alcohol. Mix it together to make a paste, paint an inch-thick band along the top and allow it to dry. Alcohol evaporates quickly so it shouldn’t be long until the powder is stuck to the side. The particles of the powder aren’t stuck on there very well and even an ant’s weight will cause them to fall off. This is temporary, as well, and some ants don’t seem to have an issue with it. Also be wary that the more ants trying to cross it, the faster it deteriorates. If you have a large colony, I suggest finding another method since it won’t be long before the ants clear a path.
Insect-a-slip, or liquid Teflon, is the absolute best barrier out there. It comes in a small bottle and is pretty pricey for the amount you get. Before you let that deter you, though, consider that one layer uses only a fraction of the bottle and lasts at the very least for some months. It does degrade faster with higher humidity, but it’s negligible in the long-run. It should last around six months - in some cases over a year - with just one application. If you can bring yourself to spend thirty USD for a three ounce bottle of the stuff, do it.
Feeding
As I have said before you will; want to freeze any arthropods before feeding your ants, place food into a separate container for easy cleaning and replacement; and use small dishes to serve the food in but there are a few other things you should probably be informed of.
Word of warning about house flies
House flies, according to MrMacophyl, a resident myrmecologist on the Yuku Ant Farms and Myrmecology message board, are poor nutrition-wise and he stated some of his colonies didn’t last as long as they could/should have due to this. Other people have had no issues with it, and some people have said their ants enjoy blowflies and such. It’s up in the air in my mind, but I tend to prefer spiders and crickets anyway.
A varied diet is a good diet
Ants like a varied diet. If you are only giving them crickets day in and day out you may find that don’t accept them as easily or at all after a while. I would assume this is because, as with all foods, each individual type of arthropod has its own nutritional content and a varied diet gives them more of the nutrients they need. I have long suspected that the lack of alates in captive colonies is due in large part to the lack of variety in their diet. Alates larvae have been studied and have found to have a different diet than worker larvae. This could be important beyond the problem with alates in captive colonies. While this may or may not be the case, I still strongly urge you to create a varied, balanced diet for your ant colony. Some good sources of sugar are honey, table sugar, potentially fruits (careful of pesticides), and maple syrup. I use a mix of 50/50 water/maple syrup mixed with chocolate flavored whey protein. All of my ants go for the stuff, including my Ponera pennsylvanica. A ten dollar can of protein mix, and a large bottle of generic brand maple syrup can last for a long time. Add a drop or two of liquid multivitamin, or half a crushed chewable vitamin to balance out the diet. You might also consider adding a small amount of vinegar to prevent mold. Some of my ants are fine with the vinegar mix, others won't touch it. Be careful, though. I'm not sure if vinegar is toxic to some ants or not, so always test it first with your specific species.
Color makes things more appetizing
There is some evidence to suggest that ants prefer green and yellow as opposed to red, blue, or orange. If possible, using green jell-o as food might just get a greater response than red jell-o or a drop of maple syrup. I like to use green jell-o with a raw egg and a drop or two of liquid multi-vitamin. This all-around tasty and nutritious dessert is great for ants, especially when finding insects is difficult. Otherwise, all of my ants (including my Ponera pennsylvanica) seem to accept a 50/50 mixture of maple syrup or honey with water, and a few scoops of chocolate flavored whey protein powder. Serve it on a piece of cotton to prevent drowning and messes and it makes a great food for both new queens and old colonies.
The color may be due to the fact ants are used to seeing green and yellow in abundance because of plants in the wild, and they know that those are the most likely places to get food.
Specialized diets
Some ants have specialized diets and this is part of the reason identifying your ant is so important. Ponera pennsylvanica only eat soft-bodied arthropods in the wild (spiders and termites for instance), Stigmatomma pallipes only eats one type of centipede along with their larvae’s hemolymph, and others are seed harvesters. It’s important to know what they eat, how to acquire it, and whether it’s safe or not (some seeds bought in the store can have pesticides or other chemicals on them which could kill your ants).
Venomous creatures
I have not had a colony accept any wasps or bees as food yet, but a few other members of the forum have. I’m sure the ants know what parts are good to eat and which ones aren’t, so don’t be afraid to try. I recently witnessed a couple of Formica exectoides carrying a dead yellow jacket back to their nest. This is solid evidence that ants don't mind eating bees or wasps and probably know how to avoid consuming the venom.
Tear the body and trim wings
I find it’s also a good idea, especially with young colonies, to cut up or tear open any insect prey before feeding. It gives the smaller, weaker nanitic workers an easier way inside to the good stuff. This is especially true for harder bodied insects such as beetles. I find ants will completely ignore a beetle unless I cut it in half for them. Trimming off any wings or spindly legs (like those on crane flies) prior to feeding can help prevent a mess in your outworld.
Test tubes/tubing as feeding tubes
Utilizing unused test tubes or lengths of aquarium tubing, you can effectively create a feeding bottle. Simply fill the tube with your liquid food, plug the open ends with cotton, and voila, the ants can drink without drowning, and you don’t have to worry about replacing it any time soon unless it molds. If your honey or syrup is too thick to do this with, thinning it out with some water is effective. I've also created make-shift outworlds using test tubes. I coat one side of a cotton piece with a liquid food, stuff it down into the end of the test tube, then place any solid foods like insects in the remaining space. Attach it to the formicarium with a length of tubing and you have an easy-to-clean, temporary foraging area for your ants.
Over- and under-feeding
Be advised that it is possible to over- or under-feed your ants. Over-feeding might give them too much food, which they will store, and it may go moldy in the nest. If the ants remove it, great, but sometimes they don’t. Under-feeding isn’t generally a huge problem, but if you are under-feeding you may notice your newest workers being smaller than usual. This is because underfed larvae, just like the queen’s first brood, don’t get enough of the stuff they need to grow to normal size. Some people have considered under-feeding as a means for population control and quickly found that the population continued to grow while the ants just got smaller.
Underfeeding while not usually a fatal error for your ants, can be so if you neglect to feed them at all for a time; but allow me to quell any fears on that. I recently had my transmission in my car die and had to go to my father’s to replace it (not paying 3,000 dollars to have a mechanic do it) and some problems have arisen. I left all of my colonies back home and fed them a bit before I left, but only intended to be gone for a week at most. However, after three weeks without me, my colonies ran out of food, but when I got back, I only had one worker death out of all of my many colonies (14ish) and most of their gasters were still quite distended. Ants are marvelously efficient creatures, so concerning yourself with underfeeding or neglect will likely only cause unnecessary worry.
Hibernation
The last thing I would like to discuss here is something commonly talked about and debated on the forums – hibernation. If your ants come from an area that doesn’t have winters in the traditional sense such as the tropics or a desert, then you don’t have to concern yourself with hibernation. For the rest of us, it can be a hot topic.
What happens during hibernation?
Generally, in the wild, a colony will store food, then sometime in the fall or early winter, seal off the nest. No foraging takes place, brood stops developing, the queen stops laying eggs, and everyone seems to go to sleep; but what about in captivity? What happens if you don’t let them hibernate? Where can you place them for the winter? What kind of environment do they need? I plan to answer these questions as best as I can.
What about captivity?
In captivity, the same thing happens as in the wild. It’s a natural cycle ants go through whether you hibernate them or not. If you choose to keep them heated and lit up during the winter, you’ll still notice less activity, no or slow brood development, no egg laying, and less foraging; it’s probably best for their health if you just let them sleep.
What happens if I don’t allow them to hibernate or keep them heated over the winter?
If you don’t let them hibernate, then there is a chance they will suffer for it. Some colonies stay perfectly healthy, others start having increased worker deaths, and all around poor colony health. I would strongly suggest letting them sleep over the winter to avoid any potential problems. It also makes caring for them even easier since during this time the only thing they need is water.
How do I put them into hibernation?
If you choose to allow your colony to hibernate, then I would suggest moving them into an unheated room or the refrigerator and leaving them alone in the dark as much as humanly possible. Check them once a week or so to ensure they have adequate water and that they aren’t freezing to death, but otherwise leave them alone. Chuck has noted that his colonies seem to be in a deeper sleep in the dark than in the light, so keep this in mind. It also may be required to lower their temperature to trigger the hibernation cycle. Placing them in the refrigerator or a cold room might give them the necessary cue.
If you have an insulated garage or shed, put a thermometer in it to monitor the temperate over the winter; anything lower than 30 degrees F may be hazardous to their health. I generally try to keep mine between 30 and 50 degrees F. Remember that subterranean ants are usually beyond four feet deep, and after this point it stays a relatively constant temperature of 55 to 60 degrees F. It’s not imperative that you cool them off completely, but if you can lower their temperature at all from your normal room temp, then you might get them into a deeper sleep. Wood-nesting ants are a different matter and they may be more resilient to cold. Then again, I don’t know how cold it would get in a nest that was a few inches deep in wood. It’s just a precaution I recommend taking if you can.
What do I do for them during hibernation?
You might want to offer some sweets during the hibernation period just in case anyone wakes up and goes foraging. It’s not all that common, but not completely unheard of either. Prior to hibernation they would have likely stored up a bunch of food in repletes anyway, so it’s not necessary. The only thing you need to be concerned with is water. If they run out and the nest dries up, they can die very quickly. Make sure they stay moist and have access to water at all times.
Some ants may appear to be dead during hibernation, but they may just be sleeping. If you’re concerned, you can remove the ant, warm it up, and check it. If it appears dead, place it on a wet paper towel for a few hours. While it is possible for ants to die during hibernation, I wouldn’t really worry myself over it until spring.
General Tips and Tricks
· A wooden BBQ skewer can be your best friend with test tubes. Breaking it in half causes a lot of splintering, and that splintered end can be used to pull stuck cotton out. Simply insert it into the cotton, and push while twisting the skewer.
· Using an air pump in a formicarium can help prevent mold by circulating the air. I have been experimenting with this in my corkboard and soil filled plaster nests and plan to report my findings and a few pictures in the coming months.
· Chilling ants for just about any purpose is an effective way to get them to cooperate. If I have an emergency and need to move a colony from a test tube ASAP, I chill them first. It slows down the ants making them less likely to scatter and escape, and they can’t cling as well to the tube making the dump go fast and easy. It’s good for taking pictures of them for identification, too.
· Use light to your advantage. When a test tube starts to mold, the easiest way to get them to move in my experience is to simply wrap the clean tube in foil, connect it to their current tube, and stick the whole thing outside or under a light. It can also be a good way to get them to dig up against a container if you use a nesting medium.
· Test tube caps can make excellent tube connectors. Simply take a drill bit roughly the size of the tubing you use, and drill into the test tube caps. I did this with all of my caps minus enough of them for feeding. The hole can be easily plugged with cotton if not in use; otherwise I can connect and disconnect tubing for a variety of different reasons. I use it to connect two tubes together for moving purposes, connect to an outworld when the workers need one, and I connect small feeding tubes for new queens and small colonies.
· Boosting ants is a little controversial, but still a very popular method to getting a colony going quickly. You simply find brood from a mature, wild nest of the same species as your queen, take some, and give it to her. If your queen has no workers yet, I don’t suggest any more than eight larvae and/or pupae as she may not be able to take care of it all. Be mindful of the fact that this brood can be diseased, or have parasites, or even be alates which are of no use to a new queen and are usually killed by the workers
· Clay makes a good, no-worry, safe adhesive. I’ve said earlier in the guide that I use it for a variety of reasons but I can’t stress its uses enough. I’ve used it to connect tubes together for moving, to cover a tube to darken it, or used it as a base for test tubes and feeding trays. Tape can get ants stuck and potentially harm or kill them, so I try to stay away from it; however I’ve had wild ants crawling on a clay ball that I rolled together before I noticed. I pulled it apart and the ant escaped, frantically cleaned itself off, but otherwise was unharmed.
· Experiment! We wouldn’t, as a community, know all these things about ant keeping if no one had tried them out in the first place. There are some amazing ideas put to use, and some amazingly simple tricks to helping you out discovered by ant hobbyists. Don’t be afraid to try new foods, tricks, or barriers and let us know how it goes! More ideas are always welcome.
Preferred diets by genus/species
Because the list is getting long, and hopefully will only get longer, I've decided to simply link to the thread with the list. It is an ongoing project and if you have anything to add, feel free to post it in that thread and I'll update it accordingly. Big thanks to everyone who has contributed to it and those who will eventually contribute to it. Preferred diets thread.
Glossary
Ant Anatomy - See this for diagrams listing the various parts of the body.
Alate – A winged reproductive
Callow – A recently eclosed, adult workers
Caste – One of the distinct forms among polymorphous social insects (minor worker, major worker)
Dealate – An unwinged reproductive
Eclosion (eclose) – The process of an adult ant emerging from a pupa, or a larva from an egg
Fully-claustral – A queen that seals herself off and doesn’t forage for food during the founding stages
Larva (pl. larvae) – The immature, wingless, feeding stage of an insect that undergoes complete metamorphosis; has three stages in ants, first second, and third instar
Monogyny (adj. monogynous) – When only a single egg-laying queen exists within a colony
Monomorphism (adj. monomorphic) – Single caste of worker within a species
Nanitic – The first workers of a new queen; typically smaller than usual
Pleometrosis (adj. pleometrotic) – When a species of queen will gather together to found, but only one will be allowed to live when the workers arrive
Polydomy (adj. polydomous) – The practice of having more than one nest for a single colony (also called satellite nests)
Polygyny (adj. polygynous) – When multiple, egg-laying queens exist within a single colony
Polymorhpism (adj. polymorphic) – Multiple castes of workers within a species (e.g., minor worker, major worker)
Pupa (pl. pupae) – An insect in the final, non-feeding transformation stage between larva and adult
Replete – A worker with a distensible crop used to store food for the use of the colony
Semi-claustral – A queen that forages prior to the first workers
Extra Resources
Antdude has a wonderful FAQ here on pbworks.
The Ant Farm and Myrmecology message board on Yuku has an active, professional, and knowledgeable community.
Alex Wild has a beautiful gallery of ants and various insects pictures with small blurbs of information that can be insightful or interesting. His blog can be found here.
Myrm's Ant Nest also has an active anting community.
Comments (0)
You don't have permission to comment on this page.